![]()
Online Catalogue


- >Celestron
- >Skywatcher & Tal
- >Meade
- >Books & Maps
- >Miscellaneous


- Celestron
- Konus
- Zenith
- Microscope Slides
- > Field Microscopes
- Trekker
- Konig Digital
- ..Micro Mobile
- Misc


- Butterfly in a Jar
- DecoBird & Animals
- Francis Barker
- >Pest Control
- >Wildlife
Box's & Feeders


![]()
Of all the many and varied telescopes available for use by amateur astronomers, all can be categorised into three types: the refractor, the reflector & the catadiopiric. Each have their relative strengths and weaknesses, but they all have a common function: to gather and focus light from distant objects to produce a bright image that may be magnified In this respect it is the aperture (i.e. the diameter of the main mirror or lens) of the telescope that performs a critical function. With larger apertures, more light is gathered so fainter objects may be perceived and the resolving power (i.e. the ability to see fine detail) is increased.
When comparing telescopes of similar type but of differing apertures, an instrument that has a main lens or mirror twice the size of another gathers four times as much light, not twice. We are comparing the collecting areas of the larger and smaller telescopes, which is proportional to the squares of the apertures. So, for example, a 120mm telescope gathers 2.25 times (225%) as much height as an instrument of 80mm aperture (120/80 = 1.5, 1.5 squared = 2.25). When it comes to seeing fine detail in an image, we are simply comparing apertures: a 120mm telescope will enable you to perceive lunar craters, for example, half the size of those visible in a 60mm instrument. No amount of magnification applied to the smaller telescope will show you that which will be visible in the larger instrument, though both images may appear equally sharp. The larger telescope merely forms its images out of smaller dots.
The Refractor
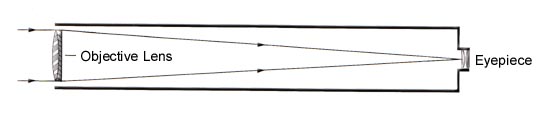
This is the type of instrument that the layman thinks of when conjuring up a mental picture of a telescope.
At the end of the tube furthest away from the observer there is an objective lens (or rather two glass elements sandwiched together for reasons to be explained in a moment) that gathers light from the object under scrutiny, to form an image at the other end which is viewed by means of an eyepiece.The objective lens can not be made of a single piece of glass since such an element is incapable of bringing light of differing wave lengths to a common locus, introducing a prismatic effect that causes bright objects to be surrounded by false rainbow colours.
This undesirable quality of retractors is virtually eliminated by making the objective out of two glass elements with optical characteristics that effectively cancel out the false colour.
Consequently, an objective lens is a piece of optical equipment that is difficult to manufacture and explains why refractors are the most expensive form of telescope, aperture for aperture. However, a refractor can deliver exquisite images that are very corrected and extremely high in contrast, suitable for observing fine lunar and planetary detail, or for separating difficult double stars. Refractors are well suited for people on the move since it IS extremely difficult for the optical components to come out of alignment. Also, the lenses will not need to be recoated in a lifetime's use and maintenance is minimal.
The Reflector
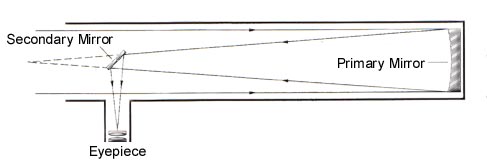
This is the cheapest form of telescope, aperture for aperture, that money can buy. In the form most encountered, the Newtonian (after Isaac Newton's design in 1668) uses a concave mirror at the base of the tube to gather and focus the light from the object under scrutiny. The light is intercepted before coming to a focus near the mouth of the tube by a small flat mirror inclined at 450 the optical axis which relays the image out of a hole in The side of the tube to a waiting eyepiece that magnifies the image in the normal fashion. Since the light is not retracted in any way, and a mirror reflects light of all colours equally, there is no false colour from a reflecting telescope.
The Catadioptric
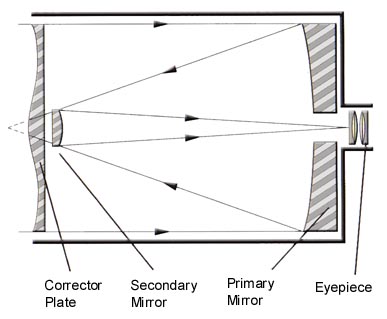
The goal of the telescope designer is to produce an optical system that delivers an image as free from any aberrations (defects) as possible in a package that is compact and manageable. This has led to designs Incorporating both reflecting and retracting elements to produce an instrument that combines the best attributes of both systems.
Thus, we now see many commercial telescopes similar to the Maksutov-Cassegrain system illustrated above That packs a long focal length into a physically short tube, while preserving the high-contrast imagery associated with refractors of the same aperture.
Catadioptric variations of the Newtonian telescope are currently very much in vogue, offering compact tube assemblies with convenient viewing positions. Since these systems often have optical windows sealing the end of the tube (which would otherwise be open in a conventional Newtonian the internal optical components are far better protected from the elements and dust
Remember that no particular design of telescope is intrinsically better than another - each is well suited to a wide variety of observational subjects. The important consideration is that the optics should be accurately manufactured and be precisely collimated (aligned).
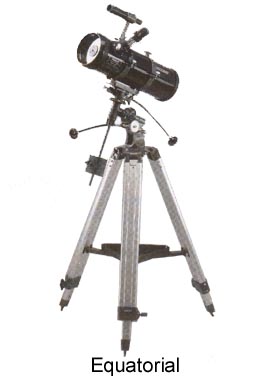
Telescopes & Mounts...
The initial assembly of your telescope is best undertaken in daylight with plenty of room to lay out the components and to familiarise with the accompanying images below to see how the assembled instrument should look.
|
|
The three legs should be attached to the tripod head one by one by the three bolts and wing nuts provided. They should not be over tightened, but just made finger tight. Pay particular attention to the orientation of each leg prior to assembly such that the tripod tray bracket is facing inward. The tripod may now be placed on the ground with the legs splayed enough for the accessory tray to be attached. Adjust the height of each leg so that the tripod head is initially kept low for maximum rigidity, taking note that the thumb screws holding the legs in place are securely tightened prior to the next stage.
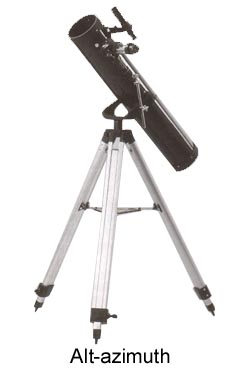
Next, attach the alt-azimuth/equatorial mount (depending on your particular model: see the Alt-azimuth or Equatorial label with the accompanying photographs above) to the tripod head, followed by the accessory tray between the tripod legs if you haven't already done so.
If your telescope mount is fitted with flexible slow motion controls these may now be attached to the two small chrome shafts on the mounting via the thumb screws on the ends of the cables, taking care to locate the screw in the machined 'notch' on each shaft.
Balancing the Telescope:
To eliminate stresses on the Equatorial mounts and to ensure smooth, judder-free motion of the telescope the instrument needs to be balanced about both the declination and polar (right ascension) axis. This is especially important if you propose to use a motor drive for astrophotography at a future date.
(i) Locate the right ascension clamp and loosen it whilst holding the telescope tube. Turn the telescope about this axis until the counterweight bar is approximately horizontal. GENTLY release your grip on the tube and note if the counterweight has a tendency to fall or rise: if it RISES, unlock the counter weight locking screw and slide it away from the telescope; if it FALLS , slowly slide the counterweight towards the telescope side of the mount. Repeat this process until the counterweight bar remains in one place with out support and clamp the counterweight screw firmly - the telescope is now balanced about the polar (right ascension) axis.
(ii) With the counterweight bar horizontal, ensure that the right ascension clamp is locked and unlock the declination clamp and turn the telescope tube so that it is also horizontal. As before, GENTLY release your grip on the tube and note is there is a tendency for one end to rise in the air. If so, slowly loosen the clamps holding the tube and slowly slide the tube towards the end that rises. Lock the tube clamp rings once more and see if the telescope remains horizontal when so positioned. Repeat this process until the telescope remains wherever you place it.
The telescope is now balanced about both the declination and polar (right ascension) axes, In due course you will add various accessories to the telescope that will slightly alter the balance position particularly if it is a camera for astrophotography) in which case you will have to go through processes (i) and (ii) again, but for now you may care to mark the balance points on the counterweight bar and the telescope tube with small pieces of tape for fast assembly in future.
Attaching the finderscope:
An essential prerequisite for the easy location of objects on both land and in the sky is the correct location and alignment of the finder- scope that attaches to the tube of the telescope. It is, in fact, a smaller version of the main telescope that is designed to have a low magnification and a wide field of view so that the desired target may be easily located. The eyepiece of the finder scope is equipped with cross-hairs much like a gun sight marking the centre of the field of view.
Aligning the finderscope:
(i) Setup the telescope on its mount outdoors in the day time and ensure that it is balanced as previously described. You may wish to extend the tripod legs and securely lock them again once you have the telescope at a comfortable working height. Enlisting the help of a friend will aid this process. Select the lowest magnification eyepiece in the set (this is the one with the largest number engraved on the cap: usually 20mm or 25mm) and place it in the focuser drawtube as previously described.
(ii) Select a distant prominent object such as the tip of an electricity pylon or the tip of a church spire, though any distant, well-defined object will do: the further away the better. In the case of an equatorial mount loosen the declination and right ascension clamps, or the altitude and azimuth locks on the alt-az mount. Sight along the tube and position it such that the telescope is pointing towards the distant landmark.
(iii) This first attempt will call for a little trial and error since the telescope will not be correctly focused, so as soon as one sees some thing blurred through the eyepiece lock the declination/right ascension clamps (equatorial mount )or the altitude and azimuth clamps (Alt-az mount). Use the slow motion controls as necessary to centre the object in the field of view.
(iv) Turn the focuser knobs back or forth until the image becomes crisp and sharp. Do not be concerned that the image appears upside down (reflecting telescope) or reversed in a left to right plane (refractor with zenith prism)
- this is perfectly natural for an astronomical telescope since there is no 'up' or 'down' in the sky and you will soon get used to it. With the image correctly focused you may wish to use the slow motion controls to perfect the alignment on the distant target.
(v) Now we can proceed to the Finder. You will note that the image it offers is upside down for the same reasons as that of the main telescope. Depending on the design of the telescope that you possess, the Finder will be attached to the main telescope by a bracket that will have either three or six radially spaced adjusting screws: if yours is of the latter type, adjust the front three screws to permit the tube of the Finder to be held centrally in the bracket. Once this has been achieved, check that the target is still central to the field of view of the main telescope then slowly adjust the rear three screws of the finder bracket until the same object is positioned in the centre of the cross-wires in the finder's eyepiece. Again it may help to have a friend to help you with this procedure. Once achieved, ensure that the lock nuts of the Finder adjusting screws are secure. Now you can loosen the locks on the polar (/azimuth) and declination (/altitude) axes and practice locating objects during the day.
Telescope basics:
Calculating the telescope 's magnification
The magnifying power of any given telescope and eyepiece is given by a simple formula that requires a knowledge of the instrument's focal length and that of the eyepiece. As we have seen, the focal length of an eyepiece is usually engraved on its cap: 10mm or 25mm, for example.
The focal length of the telescope is usually given on a label near the eyepiece focuser and is the distance from The main lens or mirror to the point at which it forms an image of a distant object. The magnification of any given telescope/eyepiece combination is given thus:
Magnification = focal length of telescope
........................... focal length of eyepiece
For example, a telescope with a focal length of 1000mm used in conjunction with a 7.5mm eyepiece would yield a magnification of 133 x (1000/7.5 and rounded to the nearest whole number), whereas the same instrument used with a 20mm eyepiece would deliver 50x. It follows that the larger the focal length of the eyepiece, the lower the magnification it will deliver with any given telescope
Why do we need to use eyepieces of differing magnification? Apart from making the image of the subject larger or smaller, magnification has a bearing on the area of sky (termed the field of view) that is visible: Higher magnifications have smaller fields of view, which can make finding objects that much more difficult (especially if your Finder is not correctly aligned - another reason for spending some time in daylight perfecting the process as out lined above.
The field of view in degrees may also be obtained by another simple formula which is valid for most types of eyepieces commonly found in amateur hands, thus:
Field of view (degrees) = ...............42
............................................... magnification
Again, for example, a telescope with a focal length of 1000mm using a 15mm eyepiece will deliver a magnification of 67x which, using the formula above, will give a field of view of 0.63 degrees. To give you some idea of scale, the Full Moon is almost exactly 0.5 degrees in diameter, so or telescope/eyepiece example would enable us to display The whole of the Moons disc within the eyepiece's field of view.
How many eyepieces should you have? Three is ideal - one low, one medium and one high magnification - though two will suffice at a pinch. A low magnification of 30-50x is advisable for observing star clusters, galaxies and nebulae since they are often spread over a wide area of sky. Medium magnifications of 80-100x are convenient for studying the craters and valleys of the Moon's surface, seeing the rings of Saturn or Jupiter and its four principal moons. Higher powers of 150- 200x will permit you to scrutinise mountain peaks and fine lunar detail, the surface features of Mars or to separate close double stars.
You can buy other eyepieces to increase the versatility of your telescope, or you may care to purchase something known as a Barlow lens that is inserted into the focusing tube before the eyepiece which doubles the magnification - a good way of getting double the performance out of each eyepiece!
As you get more proficient at observing you will come to appreciate that merely adding more magnification is useless unless the atmospheric conditions are steady enough to permit their use. On many nights the air may appear steady to the naked eye, but in the telescope the image of a bright planet such as Jupiter or Saturn will appear to shimmer, or the edge of the Moon may appear to ripple; these are the nights of so-called 'poor seeing'.
Even on a night of steady air a good general rule to employ is that you will be approaching the practical limits of your instrument on most nights when the magnification exceeds twice the aperture of your telescope in millimetres: this means that the maximum working power of an 80mm aperture instrument will be in the region of 1 60x, or 300x for a 150mm telescope.
Sherwoods Photo Ltd Orders & Information Telephone 01789-488880
RSS | XML Sitemap | HTML Sitemap | Blog